
I own a small business and at this point I still do it all myself. And when I say all I mean everything but file my taxes. I run the budget, shop for new products, materials and vendors, design and run marketing campaigns, balance the budget (most of the time) make the products, and shoot and edit the product photos. Some of my best compliments from customers comes about when they see my product photos. I often get “These photos are awesome, who does them?” To which I reply, “I do.” I usually get a furrowed brow and a “Seriously?” when I make that statement to which I reply, “Yes, it’s actually pretty easy.” And to me, it is. I took photography II every semester for 3 years in high school because I loved it so much. Sadly in college I chose business over art but the foundation of what I learned has stuck with me. All you need for a good product photo are 3 things: bright natural light, product composition and a decent camera.
The easiest of three tools you probably already have, the camera. If you have a new phone that came out in the last year or two, then your covered. Don’t believe me? Most of my instagram shots are done from my iphone.
Next, natural light. You have some in your home, somewhere at some point during the day you will have a great FREE lighting source. Most often it will be mid-morning or noon when light is softest. You don’t want any harsh light coming in at angles, you want soft bright light. I use my dinning room since it has a bunch of windows and it never gets any direct light. My best photos are taken between 10-12 each morning. If its an over cast day, even better that breaks up harsh light and makes shooting even easier. If I see clouds coming in I set up my stuff and get ready. The one tool I have that helps soften harsh light is a light diffuser. You may roll your eyes saying I thought this was supposed to be a cheap tutorial! It is, I spent $12 on a light diffuser umbrella– yes umbrella, not a light box- and that is it.


And lastly composition and editing. This is the hardest skill for people to learn but once you find what you like it’s so easy!
Setting up your shot. When you start shooting use a white background, and if not white a light colored background will do. Think simple and clean, no textured paper or paper with patterns on it. Light colored backgrounds help reflect the light and create a natural contrast to your photo. Which means less editing.
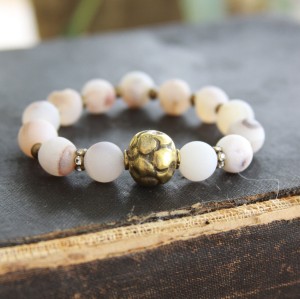
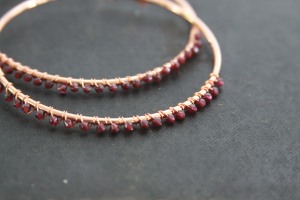
I use a wood board and then change out a few props and all of it were things I had laying around my house. A vintage book, a sea shell, some burlap. Whatever you choose, make sure it is simple, not flashy you don’t want it to detract from your product. It should only show in a small portion of your photo. Also, make sure it fits with the theme and feel of your product. I make electric bohemian jewelry so vintage items in neutral colors work very well. If I used some neon paper flowers it would throw my whole look off.
-

- Burlap flower
-
- vintage book
-

- wood board
Camera angles. I go for two to three different angles. Top down, 45 degree angle and a close up of detail. But this also depends on your product. Is it two sided? Then you’ll need a shot of both sides. Does it have an interior like a purse? It needs and interior shot. Can it be worn in different ways? Make sure you show us how. We are visual shoppers and if your selling online the more we can see of the product the better since we cannot pick up and touch. But to many photos gets tedious, make the most of what you shoot- every angle should be different giving us new information about the product. If you have three shots of the same thing just at slightly different views, who cares your not selling me anything I’ve already seen in the previous photos.


One last tip- focus, where is the focus on your product? The whole item should be clean and clear unless your trying to focus on one detail of your product and the focus should sit in the center of your photograph. There are other composition rules like the rule of thirds but you can look those up on your own if you want to add more variety to your shots.
Now it’s your turn. Try it.
*** All pictures posted are completely unedited except for the Rustic Souls ad at top. These are the results I get with the rules above. All I have to do is add a touch or contrast or saturation and crop before my photos are ready. ****
